DG8SAQ VNWA & Virtual Machines
A few years ago I migrated almost entirely to OSX & Ubuntu. However, I still had to maintain a Windows copy on one of my hard drive partitions, since a few applications were just available for Windows. In particular, DG8SAQ’s superb Vector Network Analyzer (VNWA) software. I can already use most of the applications in a Virtual machine, with the benefit of not having to reboot and change the OS, but DG8SAQ’s software with it’s USB I/O always gave me hard time. Finally, I figured out what needs to be changed. Now the VNWA runs also smoothly in a Virtual Machine.
My Virtual Machine
Since my main OS is Mac OSX (currently version 10.10) I’m using Parallels Desktop. It has the big advantage that the Guest OS (in this case Windows 8.1) can be either booted from its partition or used in a Virtual Machine within OSX. I also like Oracle’s free VirtualBox and will eventually migrate one day entirely to Virtualbox.
Buffer is key
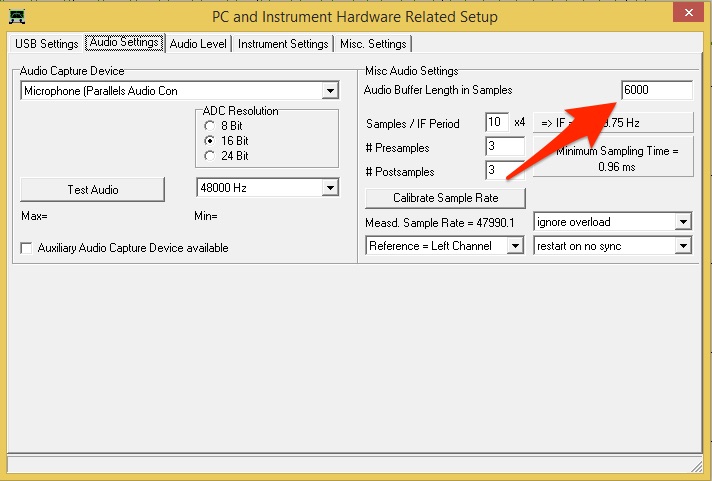
Whenever I tried to operate my VNWA within the Virtual Machine, the results were unusable. Despite that I’m using a decently equipped MacBook (Quad-Core & 16 GByte Ram), I just couldn’t make it work. The final trick was the result of a discussion with my friend Hardy, DL1GLH. Since he’s using the same VNWA on a very old Laptop (600MHz Single Core), he had to increase the Audio Buffer size. And indeed, after increasing the Audio Buffer size from 3000 to 6000 samples, the VNWA works now also smoothly in my virtualized Windows 8.1 installation. It’s slightly slower but almost not noticeable.
How to increase the Audio Buffer length
Go to: VNWA Software > Options > Audio Settings. The screenshot below will help you to find the parameter.